

Run your hand over a sweater you have worn for a few years and you can feel its history: a fuzzier patch along the sleeves, a seam that gives more than it did. This guide follows a garment through wearing, washing and drying, and ends with the small repairs you can do with a needle and thread.
What wears a garment out
Hold a T-shirt that has been through many washes next to a new one. The older one feels thinner, small balls of fibre may cling to its surface, and a dark colour has turned flat. Four things do most of this: rubbing in wear, the water and movement of the wash, tumbling and heat in a dryer, and strong light, which fades dyes.
A 2022 survey of discarded garments by Cooper and Claxton in the Journal of Cleaner Production found that the most common causes of garment failure were pilling and colour fading; others included fabric breakdown, shrinking or stretching, and holes in seams. A 2025 University of Leeds and WRAP study of 47 T-shirts calls pilling the main reason people give up a T-shirt.
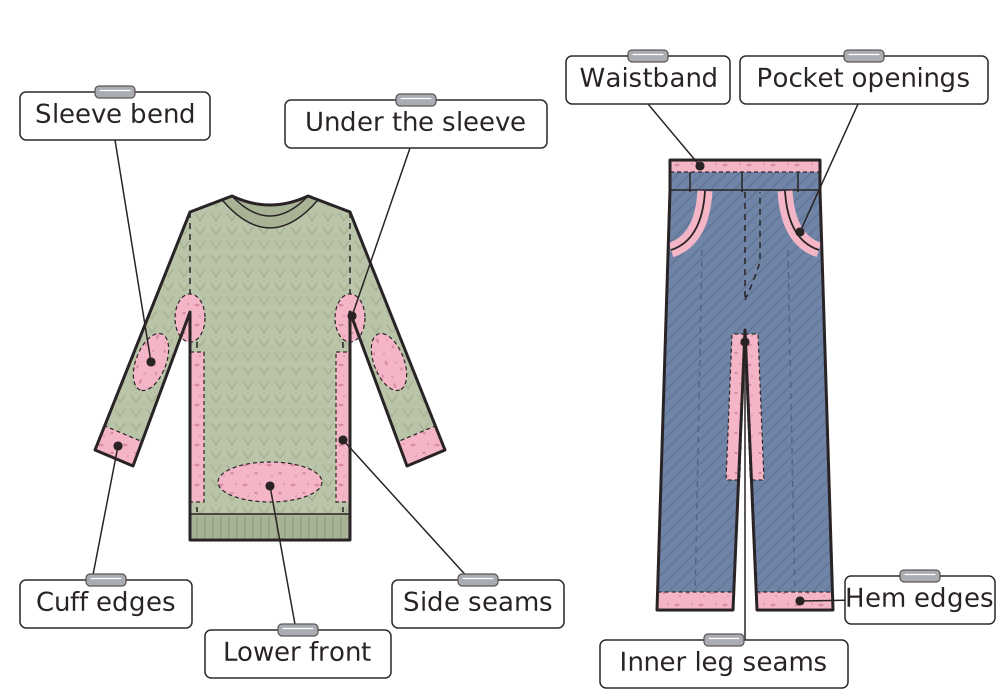
Pilling starts with rubbing. The Woolmark Company’s pilling page (seen November 2026) places it mostly along and under the sleeves, at the sides and on the lower front of a sweater, where the fabric rubs against a desk, a bag strap or itself. Most ageing happens in ordinary use, which is where you can change it.
Wearing: rest, rotation and the wash you can skip
Fold a wool sweater over your hand after a long day of wear and it feels a little slack at the sleeves. Wool gives as it is worn and recovers when left alone. The Woolmark Company’s guide to caring for wool (seen November 2026) suggests resting wool garments for 24 hours before wearing them again, and laying them flat for an hour to air. For woven pieces, it suggests a soft brush moved lengthwise after wearing, and empty pockets.
Rotation follows: wear a different piece the next day and each one rests and meets the washing machine less often, which matters because the wash is where colour and fibre leave the fabric.
How often a garment needs washing depends on its fibre. A 2017 literature review by Laitala, Klepp and Henry found that wool garments are used about twice as many days between washes as similar cotton ones, and a 2020 study of laundry habits in five countries found that washing frequency differs by fibre and by country. What decides is whether a garment is soiled or only needs air. A single mark can often be treated alone, within what the care label allows; test first on an inside seam, because some fabrics keep a ring where water has dried.
For storage, the same guide suggests folding knits and hanging woven wool garments on shaped hangers.
The care label sets the limit
Find the small sewn-in label, usually in a side seam or inside the collar. Its symbols state how much treatment the fabric can take, and every later choice stays within them.
GINETEX, the international association for textile care labelling, sets out five symbols in a fixed order: washing, bleaching, drying, ironing and professional care. Its care labelling page (seen November 2026) says they give "the maximum permitted treatment", and that milder treatments and lower temperatures are always permitted. These symbols are the origin of the standard ISO 3758, whose fourth edition was published on 6 December 2023. Labels in North America often use a related five-symbol system, ASTM D5489 (updated 1 August 2025), so the label in your garment decides, not a chart made for another market.
| Order | Shape | What the marks add |
|---|---|---|
| 1. Washing | A tub | The number is the highest temperature in °C. One bar under it: a milder cycle; two bars: very mild. |
| 2. Bleaching | A triangle | Empty: any bleach. Two oblique lines: oxygen-based bleach only. A cross: no bleach. |
| 3. Drying | A square | A circle inside: tumble drying, dots for the heat. Lines: line, drip or flat drying. An oblique line: in the shade. |
| 4. Ironing | An iron | Dots give the temperature range. |
| 5. Professional care | A circle | Letters name the cleaning process allowed; a bar under it limits that process. |
The GINETEX care symbols page shows every symbol in the set.
Washing: less often, cooler, shorter, fuller
A dark T-shirt that has been washed often feels drier and rougher between your fingers. Each wash takes a little dye and fibre out of the fabric, and four settings decide how much.
Temperature and time
In a University of Leeds test reported on 14 January 2020, 20 dark and bright T-shirts went through 16 household washes of either 30 minutes at 25 °C (about 77 °F) or 85 minutes at 40 °C (about 104 °F). The cooler, quicker cycle left significantly less colour loss and dye transfer, with up to 74% less dye and up to 52% less microfibre released.
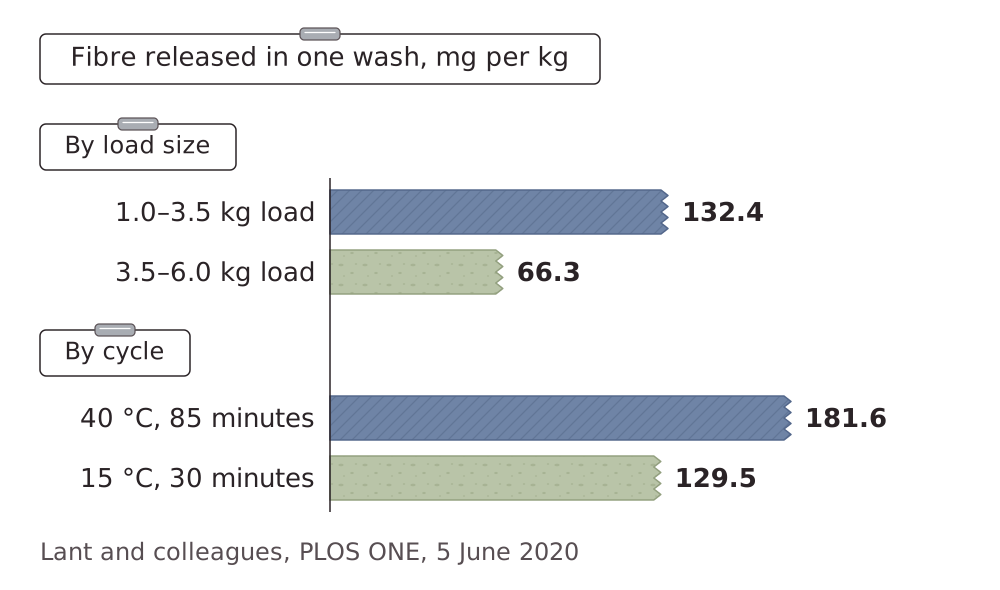
A study published in PLOS ONE on 5 June 2020 by Lant and colleagues washed real household loads collected in the UK. A 30-minute cycle at 15 °C (about 59 °F) released 30% less fibre than an 85-minute cycle at 40 °C, and white test fabrics lost about 42% less whiteness. Both studies were funded by a detergent maker.
How full the drum is
The same study found that fuller loads lost less fibre for each kilogram of fabric: loads of 3.5 to 6.0 kg (about 8 to 13 lb) released about half as much as loads of 1.0 to 3.5 kg (about 2 to 8 lb). The authors explain that in a small load, more water flows through each yarn and pulls more fibre out. Northumbria University’s release on the study describes a well-filled drum as around three-quarters full. Drums differ between front-loading and top-loading machines and between makers, so check your machine’s manual; for a small load, cleanright.eu, the laundry guide of the detergent makers’ association A.I.S.E., suggests the partial-load programme (seen November 2026).
Detergent dose
Dose by soil, water hardness and load, following the pack; cleanright.eu notes that the standard dosage table assumes a 4 to 5 kg machine. Too much detergent can leave a residue on clothes; too little can leave soil, a dull haze and stains that set into the fabric. In the PLOS ONE study, neither detergent nor fabric softener made a significant difference to fibre loss; on wool, the Woolmark Company’s pilling page advises leaving softener out.
How the garment goes in
Turn knits and dark or printed garments inside out so the rubbing falls on the inner face, close zips and hooks so they do not catch a knit, and put fine knits in a mesh wash bag. For linen, the Alliance for European Flax-Linen & Hemp’s care page (seen November 2026) suggests a delicate programme at 30 °C (about 86 °F), and notes that too much spin creases linen and reduces its longevity.
Drying: where shrinkage happens
A cotton T-shirt taken from a long tumble feels warm, soft and a little smaller. Research by Cotton Incorporated, a cotton industry research body, reported in Textile World on 1 December 2005, found that tumbling does this more than heat. A load of 100% cotton interlock knit shrank more than 20% after 45 minutes of tumbling with no heat; loads dried at about 66 °C and 93 °C (150 °F and 200 °F) shrank as much, only faster. The researchers advised tumbling knitted cotton for no more than five minutes to remove wrinkles, then hanging it to dry.
Heat matters for strength. In a study of 100% cotton fabrics announced by the American Chemical Society on 25 August 1999, fabrics dried repeatedly at high temperatures eventually tore more easily than those dried at room temperature or outside, and cracks in the fibres can reduce fabric strength by 25% or more. In the 2025 Leeds study, after 50 cycles of a 30 °C wash and a tumble dry, cotton T-shirts tended to shrink more than synthetic ones.
Knits are heavy when wet, and that weight pulls them longer on a line or a hanger. The Woolmark Company’s drying page (seen November 2026) suggests drying knits flat and easing them back into shape by hand while damp, and hanging woven pieces out of direct sun and away from direct heat. Linen dries well in the open air in the shade; in a dryer, the flax-linen alliance suggests low heat and taking it out slightly damp.
| Method | Suits | Watch for | On the label |
|---|---|---|---|
| Line or hanger | Woven pieces, linen | Knits stretching; fading in direct sun | Lines in the square |
| Flat | Knits | Reshape while damp | Lines in the square |
| Tumble dryer | What the label allows | Cotton knits shrinking; strength loss from repeated high heat | A circle in the square |
Small repairs at home
Run your fingers along a hem or a seam and you often find the first sign of failure early: a stitch that has let go, a button turning too freely on its thread. Most need only a needle, matching thread and small scissors. The steps follow the Woolmark Company’s repair page (seen November 2026).
Pills come off by hand once the garment is dry, or with a comb used very gently or a battery fabric shaver; go lightly on fine knits, since heavy shaving thins them.
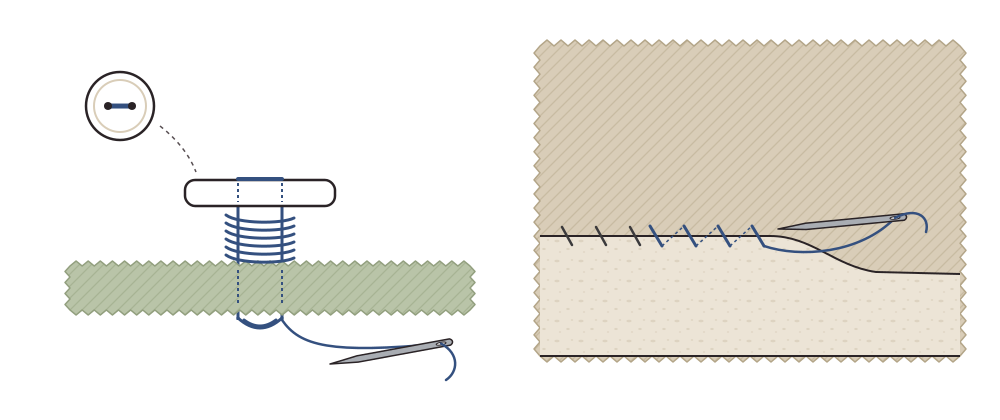
To sew on a loose button:
- Thread the needle and knot the end.
- Stitch through the holes until the button feels firm; on a four-hole button, alternate between the two opposite pairs.
- Wrap the thread about six times around the stitches between the button and the fabric. This short stem, the shank, lifts the button so the buttonhole has room.
- Push the needle through to the inside, make three or four small stitches there and cut the thread.
To catch a dropped hem:
- Turn the garment inside out and press the hem flat along its fold.
- Start at least 2 cm (about 3/4 in) before the gap, where the hem still holds.
- Make tiny diagonal stitches about 1 cm (about 3/8 in) apart, picking up only a thread or two of the outer fabric so they barely show.
- Keep the thread slightly loose, since pulling it tight can break it or pucker the fabric, and finish with a short backstitch.
The same page covers three more repairs:
- A split seam. Inside out, start with a short backstitch about 1 cm before the split, through both layers, and backstitch along the old line so each stitch overlaps the last. Press.
- A small hole in a knit. Inside out, over a darning egg or a ball, sew running stitches back and forth across the hole, then draw the thread gently to close it.
- A small tear in a woven fabric. From the inside, pin a patch of similar cloth behind it, at least 1 cm larger than the tear all round and lined up with the grain, and stitch around its edge.
Broken zips, linings, tailored jackets, leather and suede, long tears, and anything whose label allows professional care only are work for a tailor or repair service.
A routine by garment
The table gathers the guide by garment; each cell repeats a point made above.
| Garment | Between wears | Wash | Dry | Repair to watch for |
|---|---|---|---|---|
| Wool knit sweater | Rest a day; air flat | Wool cycle, inside out, no softener | Flat, reshaped | Pills; a small hole |
| Cotton T-shirt | Air it | Cooler, shorter, inside out, a fuller drum | Line or flat | Pills; a split seam |
| Woven cotton shirt | Air on a hanger | As the label states | On a hanger, out of direct sun | A loose button |
| Linen piece | Air on a hanger | Delicate, 30 °C, light spin | Open air, in the shade | A dropped hem |
| Tailored jacket | Brush lengthwise; rest | As the label states | Shaped hanger, away from heat | Work for a tailor |
Whatever the garment, its care label sets the limits, and your machine’s manual and the detergent pack say how to work within them. Inside those limits, the gentler setting tends to spare the fabric, and its feel in your hand tells you whether a garment needs rest, air, a wash or a stitch. Our editorial policy explains how we choose and check the sources quoted here.